【angr_ctf】二进制分析工具angr使用与练习-Part I(基础篇)
前言
本文记录一下学习使用angr过程中的一些心得,主要是基于Github上 的开源项目jakespringer/angr_ctf[3],该项目通过angr来解决一些ctf题,帮助初学者一步步熟悉angr的使用。相关的参考资料放在了文末,包括一些我认为讲解地不错的angr相关的文章。所有题解我打算分成基础篇,提高篇,进阶篇三个部分,对应三篇文章来完成,本文属于基础篇。
由于本人也是初学,文章中许多理解都是建于参考资料和个人的思考上,难免存在纰漏或理解不正确的地方,望大佬发现后能及时指出,不胜感激🙏
对于angr_ctf的使用,简单说明一下,每个题目都包括如下内容:
xx_angr_xx.c.templite: c源码模板文件generate.py: 原仓库中没有现成的二进制文件,需要使用者通过执行python generate.py 123 filename的方式来手动编译(123是随机数,用于混淆)scaffoldxx.py:解题提示,作者在关键位置用???,...的方式进行了替代,也可以看作是官方提供的解题模板solve.py:位于solutions,是题解
00_angr_find
直接拖到ida中查看一下源代码:
int __cdecl main(int argc, const char **argv, const char **envp)
{
  int i; // [esp+1Ch] [ebp-1Ch]
  char s1[9]; // [esp+23h] [ebp-15h]
  unsigned int v6; // [esp+2Ch] [ebp-Ch]

  v6 = __readgsdword(0x14u);
  printf("Enter the password: ");
  __isoc99_scanf("%8s", s1);
  for ( i = 0; i <= 7; ++i )
    s1[i] = complex_function(s1[i], i);
  if ( !strcmp(s1, "DVNBCPLR") )
    puts("Good Job.");
  else
    puts("Try again.");
  return 0;

int __cdecl complex_function(signed int a1, int a2)
{
  if ( a1 <= 64 || a1 > 90 )
  {
    puts("Try again.");
    exit(1);
  }
  return (3 * a2 + a1 - 65) % 26 + 65;
}题意很简单,对一个输入的长度为7的字符串每一位做一个变换complex_function,然后和目标字符串DVNBCPLR比对,如果相同,则正确。同时还限制了字符的范围为[64,90)。
暴力破解
只需要一个双重for循环,第一层遍历字符串位数,第二层遍历可选的字符串,然后判断每一个变换后的字符与目标字符是否相等即可,解答如下:
def complex_function(a1, a2):
    return (3 * a2 + a1 - 65) % 26 + 65

def violence_solve():
    '''
    find a string, for each character in the string, after transfered by function complex_function, it will be the same as the target character in target_str(password)
    :return:
    '''
    target_str = 'DVNBCPLR'
    flag = ''
    for i, v in zip(range(8), target_str):
        for j in range(64, 90):
            if chr(complex_function(j, i)) == v:
                flag += chr(j)
                break
    print(f'[+] Success, flag is {flag}')
angr解答
angr的强大在于他能遍历程序的路径,找出能够执行指定路径的测试用例(核心就是符号执行的思想),因此我们只需要给定我们希望执行到的路径,然后拿到对应的输入用例即可。在本题中,希望执行的路径到达puts("Good Job"),只需要给angr提供对应该语句所在的内存地址(通过ida查看得到):
下面对应题解中的代码辅以注释来理解整个过程中angr做的事情:
def angr_solve():
    path_to_binary = '00_angr_find'  # 二进制文件路径
    project = angr.Project(path_to_binary)  # 将二进制文件装载成angr中指定的Project对象

    # factory提供了Project对象的一系列调用接口,entry_state()则是提供了一个程序的实例镜像(SimState对象),
    # 模拟程序执行某个时刻的状态(记录一系列程序运行时信息,如内存/寄存器/文件系统数据),一般我们选择程序的入口
    # 状态entry_state()即可,程序会从main函数开始运行
    initial_state = project.factory.entry_state()

    # 有了状态之后,我们需要模拟程序的运行,即用到`Simulation Managers`(缩写是simgr),接受一个状态信息初始化,
    # 通过操控simgr达到模拟程序运行的目的
    simulation = project.factory.simgr(initial_state)

    # 程序需要检索的目的地址,通过一个具体的内存地址,表示路径需要经过的节点,换言之,就是我们想要路径的限制条件
    # 通过simgr的explore()函数实现查找,这里的地址使用ida中看到的Good Job对应的内存地址
    print_good_address = 0x08048678
    simulation.explore(find=print_good_address)

    # simgr会把找到的符合要求的路径存储在found中,取第一个找到的状态,posix.dumps(sys.stdin.fileno())则是
    # 获取当前状态下stdin输入的数据,即程序的输入值
    if simulation.found:
        solution_state = simulation.found[0]
        solution = solution_state.posix.dumps(sys.stdin.fileno())  # sys.stdin.fileno() 代表程序的标准输入,具体值为0
        print('[+] Success, flag is {}'.format(solution.decode('utf-8')))
    else:
        raise Exception('Could not find the solution')
由该题解我们也可以对angr分析程序的过程有一个基本的映像:
加载二进制文件为
Project对象获取程序的初始化状态
state创建程序的模拟管理器
simgr,用于控制程序的模拟运行,从我们提供的初始化状态state开始设定要
find的路径(通过内存地址的限制方式或其他),记录该路径下的state信息,执行expolre检查路径查找结果,获取路径相应的状态信息,并从
state中提取需要的信息(如标准输入的值)
到此,这个题算是做完了,但对于angr的理解目前也仅仅是会用一点而已,后面根据更多的题目练习来加深对angr的掌握,同时慢慢理解其内部的运行机制。
01_angr_avoid
该题中main函数的代码非常长,直接用ida反编译源代码解析不出来,这里用到另外一个源代码反编译工具retdec,官网的使用部分有一点缺陷(我下载最新的已编译程序是python脚本),将
$RETDEC_INSTALL_DIR\bin\retdec-decompiler.exe test.exe改成
$ python RETDEC_INSTALL_DIR\bin\retdec-decompiler.py test.exe源代码非常多(接近7w行),但大部分是重复性的垃圾代码,将其中核心的部分摘录出来得到:
// ------------------- Function Prototypes --------------------

int32_t avoid_me(void);
int32_t complex_function(int32_t a1, int32_t a2);
int32_t maybe_good(int32_t str, int32_t str2);

// --------------------- Global Variables ---------------------

char g1 = 1; // 0x80d603d
int32_t g2;

// ------------------------ Functions -------------------------

// Address range: 0x8048549 - 0x80485a8
int32_t complex_function(int32_t a1, int32_t a2) {
    uint32_t v1 = a1 - 65;
    if (v1 < 26) {
        int32_t v2 = 5 * a2; // 0x8048583
        int32_t v3 = v2 + v1; // 0x8048585
        return v2 + a1 + v3 % 26 - v3;
    }
    // 0x804855b
    puts("Try again.");
    exit(1);
    // UNREACHABLE
}

// Address range: 0x80485a8 - 0x80485b5
int32_t avoid_me(void) {
    // 0x80485a8
    *(char *)0x80d603d = 0;
    int32_t result; // 0x80485a8
    return result;
}

// Address range: 0x80485b5 - 0x8048602
int32_t maybe_good(int32_t str, int32_t str2) {
    // 0x80485b5
    if (g1 == 0 || strncmp((char *)str, (char *)str2, 8) != 0) {
        // 0x80485ff
        return puts("Try again.");
    }
    // 0x80485ff
    return puts("Good Job.");
}

// Address range: 0x8048602 - 0x80d458d
int main(int argc, char ** argv) {
    int32_t v1 = __readgsdword(20); // 0x804861b
    int32_t v2; // bp-40, 0x8048602
    int32_t v3 = &v2;
    for (int32_t i = 0; i < 20; i++) {
        // 0x804862f
        *(char *)(i + v3) = 0;
    }
    // 0x8048644
    int32_t v4; // bp-96, 0x8048602
    int32_t v5 = &v4; // 0x8048610
    v2 = 0x5a4c5850;
    printf("Enter the password: ");
    int32_t v6; // bp-60, 0x8048602
    scanf("%8s", &v6);
    int32_t v7 = &v6;
    int32_t * v8 = (int32_t *)(v5 - 12);
    int32_t * v9 = (int32_t *)(v5 - 16);
    for (int32_t i = 0; i < 8; i++) {
        char * v10 = (char *)(i + v7); // 0x8048689
        *v8 = i;
        *v9 = (int32_t)*v10;
        *v10 = (char)complex_function(i, (int32_t)&g2);
    }
    uint32_t v11; // 0x8048602
    uint32_t v12; // 0x8048602
    if ((v12 & 16) == 0 == ((v11 & 16) != 0)) {
        // 0x808e62f
        avoid_me();
        if ((v12 & 8) != 0 == ((v11 & 8) != 0)) {
            if ((v12 & 4) != 0 == ((v11 & 4) != 0)) {
                if ((v12 & 2) == 0 == ((v11 & 2) != 0)) {
                    // 0x80cb9bf
                    avoid_me();
                    if (v12 % 2 == 0 == (v11 % 2 != 0)) {
                        // 0x80cffb7
                        avoid_me();
                        if ((char)(v2 ^ v6) > -1) {
                            if ((v6 & 64) != 0 == ((v2 & 64) != 0)) {
                                if ((v6 & 32) != 0 == ((v2 & 32) != 0)) {
                                    if ((v6 & 16) == 0 == ((v2 & 16) != 0)) {
                                        // 0x80d4149
                                        avoid_me();
                                        if ((v6 & 8) == 0 == ((v2 & 8) != 0)) {
                                            // 0x80d4379
                                            avoid_me();
                                            if ((v6 & 4) == 0 == ((v2 & 4) != 0)) {
                                                // 0x80d4491
                                                avoid_me();
                                                if ((v6 & 2) == 0 == ((v2 & 2) != 0)) {
                                                    // 0x80d4515
                                                    avoid_me();
                                                    if (v6 % 2 != 0 == (v2 % 2 != 0)) {
                                                        // 0x80d455c
                                                        *v8 = v3;
                                                        *v9 = v7;
                                                        maybe_good((int32_t)&g2, (int32_t)&g2);
                                                    } else {
                                                        // 0x80d4542
                                                        avoid_me();
                                                        *v8 = v3;
                                                        *v9 = v7;
                                                        maybe_good((int32_t)&g2, (int32_t)&g2);
                                                    }
                                                } else {
                                                    if (v6 % 2 != 0 == (v2 % 2 != 0)) {
                                                        // 0x80d4500
                                                        *v8 = v3;
                                                        *v9 = v7;
                                                        maybe_good((int32_t)&g2, (int32_t)&g2);
                                                    } else {
                                                        // 0x80d44e6
                                                        avoid_me();
                                                        *v8 = v3;
                                                        *v9 = v7;
                                                        maybe_good((int32_t)&g2, (int32_t)&g2);
                                                    }
                                                }
                                            } else {
                                                // 在此之后一直是这样的重复代码
                                                if ((v6 & 2) == 0 == ((v2 & 2) != 0)) {
                                                    // 0x80d442f
                                                    avoid_me();
                                                    if (v6 % 2 != 0 == (v2 % 2 != 0)) {
                                                        // 0x80d4479
                                                        *v8 = v3;
                                                        *v9 = v7;
                                                        maybe_good((int32_t)&g2, (int32_t)&g2);
                                                    } else {
                                                        // 0x80d445c
                                                        avoid_me();
                                                        *v8 = v3;
                                                        *v9 = v7;
                                                        maybe_good((int32_t)&g2, (int32_t)&g2);
                                                    }
                                                } else {
                                                    if (v6 % 2 != 0 == (v2 % 2 != 0)) {
                                                        // 0x80d4417
                                                        *v8 = v3;
                                                        *v9 = v7;
                                                        maybe_good((int32_t)&g2, (int32_t)&g2);
                                                    } else {
                                                        // 0x80d43fa
                                                        avoid_me();
                                                        *v8 = v3;
                                                        *v9 = v7;
                                                        maybe_good((int32_t)&g2, (int32_t)&g2);
                                                    }
                                                }
                                            }
          ....
    }
    int32_t result = 0; // 0x80d457e
    if (v1 != __readgsdword(20)) {
        // 0x80d4580
        __stack_chk_fail();
        result = &g2;
    }
    // 0x80d4585
    return result;
}可以看出程序由大量的if语句堆砌,非常适合用符号执行的方式遍历路径,为了减少遍历的路径数,提高搜索效率,我们应该避免让程序进入我们不希望执行的分支中,在本题中就是avoid_me(),这就用到了explore()的另一参数avoid,它用于指定不希望程序进入的路径。
下面给出题解,并附上必要注释(前面已经讲过的内容会简略):
两个必要的地址信息在上述的源代码中已存在
import angr
import sys

def main():
  path_to_binary = '01_angr_avoid'

  # 加载程序为Project对象
  project = angr.Project(path_to_binary)
  # 获取初始化状态
  initial_state = project.factory.entry_state()
  # 模拟执行
  simulation = project.factory.simgr(initial_state)

  # 我们想要进入的分支地址,此处对应Good Job的语句
  print_good_address = 0x80485ff  # 检查源代码中 Good Job对应地址
  # 不希望执行的分支,此处对应avoid_me()函数的地址
  will_not_succeed_address = 0x80485a8  # 检查源代码中 avoid_me()对应地址
  simulation.explore(find=print_good_address, avoid=will_not_succeed_address)

  if simulation.found:
    solution_state = simulation.found[0]
    solution = solution_state.posix.dumps(sys.stdin.fileno())
    print('[+] Success, flag is {}'.format(solution.decode('utf-8')))

  else:
    raise Exception('Could not find the solution')

if __name__ == '__main__':
  main()

你可以尝试去掉avoid参数,同样能够达到目的,但时间上花销会更多~
02_angr_find_condition
本题与第一题是一样的,只不过顾名思义,通过condition的方式来选择find和avoid的分支,之前我们一直是反编译之后手动填写相应的语句内存地址,实际上在选择分支的时候可以根据对应的输出结果来判断,在explore的时候传入函数,用于指定什么情况下选择该路径,什么时候跳过该路径,即定义:
is_successful(state): 进入分支的条件should_abort(state): 跳过分支的条件
最终代码如下:
import angr
import sys

def main():
    path_to_binary = '02_angr_find_condition'
    project = angr.Project(path_to_binary)
    initial_state = project.factory.entry_state()
    simulation = project.factory.simgr(initial_state)

    def is_successful(state):
        stdout_output = state.posix.dumps(sys.stdout.fileno())

        # 在对输出进行判断的时候有两种方式,str compare or bytes compare
        return True if 'Good Job.' in stdout_output.decode('utf-8') else False
        # return True if b'Good Job.' in stdout_output else False

    def should_abort(state):
        stdout_output = state.posix.dumps(sys.stdout.fileno())
        return True if 'Try again.' in stdout_output.decode('utf-8') else False

    simulation.explore(find=is_successful, avoid=should_abort)

    if simulation.found:
        solution_state = simulation.found[0]
        solution = solution_state.posix.dumps(sys.stdin.fileno())
        print('[+] Success, flag is {}'.format(solution.decode('utf-8')))
    else:
        raise Exception('Could not find the solution')

if __name__ == '__main__':
    main()

03_angr_symbolic_registers
先看下反编译代码:
int __cdecl main(int argc, const char **argv, const char **envp)
{
  int v3; // ebx
  int v4; // eax
  int v5; // edx
  int v6; // ST1C_4
  unsigned int v7; // ST14_4
  unsigned int v9; // [esp+8h] [ebp-10h]
  unsigned int v10; // [esp+Ch] [ebp-Ch]

  printf("Enter the password: ");
  v4 = get_user_input();
  v6 = v5;
  v7 = complex_function_1(v4);
  v9 = complex_function_2(v3);
  v10 = complex_function_3(v6);
  if ( v7 || v9 || v10 )
    puts("Try again.");
  else
    puts("Good Job.");
  return 0;
}

int get_user_input()
{
  int v1; // [esp+0h] [ebp-18h]
  int v2; // [esp+4h] [ebp-14h]
  int v3; // [esp+8h] [ebp-10h]
  unsigned int v4; // [esp+Ch] [ebp-Ch]

  v4 = __readgsdword(0x14u);
  __isoc99_scanf("%x %x %x", &v1, &v2, &v3);
  return v1;
}

unsigned int __cdecl complex_function_1(int a1)
{
  return (((((((((((a1 ^ 0x446D96EE) - 65034369) ^ 0x8C9C6B06) - 506201578 + 1306428696) ^ 0x11B9DE9C) - 1979576599) ^ 0xF1A3C94B)
           + 1419260309) ^ 0x92896C8)
         - 383475520) ^ 0xA2B0AE1F)
       - 963798047
       + 2098953909;
}


unsigned int __cdecl complex_function_2(int a1)
{
  return (((((((((((((((((((a1 ^ 0xFA55CC03) + 1408082538) ^ 0xF637E394) - 1155370027) ^ 0xC6F7A83A)
                     - 286307825
                     + 847018205) ^ 0x9E46424)
                   + 829215924) ^ 0xD0D3A782)
                 + 267178483) ^ 0x6595F087)
               + 1151870818) ^ 0x8529CCF3)
             - 2092276806) ^ 0xCBDB3CE1)
           - 1204004829) ^ 0x6E55C638)
         + 1720283269) ^ 0xAEFB68D3)
       + 1956986548;
}

unsigned int __cdecl complex_function_3(int a1)
{
  return ((((((((a1 ^ 0xFD2D6C3F) - 831184883) ^ 0x6633C3C9) - 358411895) ^ 0xC4FF8776) - 763680393) ^ 0xEAE4DB7B)
        - 954507130) ^ 0xF35005F6;
}程序对用户输入的三个值进行了不同的三种变换,最终需要变换后的三个变量同时满足为false,其实本质上和之前的题一样,我们依然能用之前的方法解决,代码如下:
import angr
import sys

def basic():
    path_to_binary = '03_angr_symbolic_registers'
    project = angr.Project(path_to_binary)
    initial_state = project.factory.entry_state()
    simulation = project.factory.simgr(initial_state)

    # Define a function that checks if you have found the state you are looking
    # for.
    def is_successful(state):
        # Dump whatever has been printed out by the binary so far into a string.
        stdout_output = state.posix.dumps(sys.stdout.fileno())

        # Return whether 'Good Job.' has been printed yet.
        # (!)
        return True if 'Good Job.' in stdout_output.decode('utf-8') else False
        # return True if b'Good Job.' in stdout_output else False

        # Same as above, but this time check if the state should abort. If you return
        # False, Angr will continue to step the state. In this specific challenge, the
        # only time at which you will know you should abort is when the program prints
        # "Try again."

    def should_abort(state):
        stdout_output = state.posix.dumps(sys.stdout.fileno())
        return True if 'Try again.' in stdout_output.decode('utf-8') else False

    # Tell Angr to explore the binary and find any state that is_successful identfies
    # as a successful state by returning True.
    simulation.explore(find=is_successful, avoid=should_abort)

    if simulation.found:
        solution_state = simulation.found[0]
        solution = solution_state.posix.dumps(sys.stdin.fileno())
        print('[+] Success, flag is {}'.format(solution.decode('utf-8')))
    else:
        raise Exception('Could not find the solution')


if __name__ == "__main__":
    basic()
这部分代码应该很熟练了,但总是用那三板斧,遇到更加复杂的问题可能就抡不动了。本题实际上是希望我们学会利用angr来实现对寄存器中值的操作。
- 需要控制的变量在
get_user_input输入部分,我们看下该本部分的汇编代码

获取了三个输入,并分别保存到了
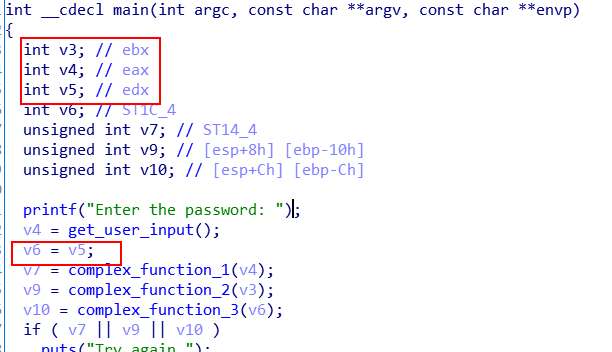
eax,ebx,edx寄存器中(注意第一个改变寄存器值相应的内存地址0804881E,后面用到),意味着我们如果能修改寄存器的值,那么直接修改这三个寄存器,就不需要从main函数入口进入了,恰巧angr就支持这种操作。除了从汇编代码,也可以从反编译后的注释中发现传入的三个变量存储的寄存器
- 当我们不从main函数入口进入时,在初始化
state的时候就不用entry_state()了,改用blank_state(),它用于创建一个空的状态,因为我们是“空降”到程序的某一位置的,此时程序所有的状态需要我们自己指定,下表解释了常用的状态构造方法[1]:
| 名称 | 描述 |
|---|---|
entry_state() |
构造一个已经准备好从函数入口点(main)执行的状态 |
blank_state() |
构造一个“空状态”,它的大多数数据都是未初始化的。当使用未初始化的的数据时,一个不受约束的符号值将会被返回,记住当需要从程序中任意一点执行的时候使用 |
call_state() |
构造一个已经准备好执行某个函数的状态 |
full_init_state() |
构造一个已经执行过所有与需要执行的初始化函数,并准备从函数入口点执行的状态。比如,共享库构造函数(constructor)或预初始化器。当这些执行完之后,程序将会跳到入口点 |
有了上面的基础知识后,看题解源码,我会在必要的位置添加注释帮助理解:
import angr
import sys
import claripy

def main():
    path_to_binary = "03_angr_symbolic_registers"
    project = angr.Project(path_to_binary, auto_load_libs=False)

    # 0x0804881E 这个地址是将输入值传入寄存器的起始地址,也是我们需要的“空降”位置
    start_address = 0x0804881E

    # 不再是entry_state()了,通过给定的起始地址,在该处创建一个空白状态
    initial_state = project.factory.blank_state(addr=start_address)

    # 这里我们需要创建位向量,实际上就是保存寄存器值的变量(变量名称随意),在符号执行中用的符号变量,如\alpha,
    # 指定32位是因为程序本身是32位的
    passwd_size_in_bits = 32
    passwd0 = claripy.BVS('passwd0', passwd_size_in_bits)
    passwd1 = claripy.BVS('passwd1', passwd_size_in_bits)
    passwd2 = claripy.BVS('passwd2', passwd_size_in_bits)

    # 将符号变量存储到寄存器中,在程序模拟执行阶段就由这些符号值代替实际输入执行,以遍历所有路径
    initial_state.regs.eax = passwd0
    initial_state.regs.ebx = passwd1
    initial_state.regs.edx = passwd2

    simulation = project.factory.simgr(initial_state)

    def is_successful(state):
        stdout_output = state.posix.dumps(sys.stdout.fileno())
        return True if 'Good Job.' in stdout_output.decode('utf-8') else False

    def should_abort(state):
        stdout_output = state.posix.dumps(sys.stdout.fileno())
        return True if 'Try again.' in stdout_output.decode('utf-8') else False

    simulation.explore(find=is_successful, avoid=should_abort)

    if simulation.found:
        # 分别对三个符号变量进行约束求解,获取测试用例,format(...,'x')是将16进制转换为字符串
        # 此处不能像之前一样用.posix.dumps(0)的方式获取终端输入了,因为我们不是从程序入口进入的,
        # 跳过了输入的部分,因此我们需要通过对自定义的符号变量(位向量)进行约束求解,
        # 采用.solver.eval(BVS)的方式
        solution_state = simulation.found[0]
        solution0 = format(solution_state.solver.eval(passwd0), 'x')
        solution1 = format(solution_state.solver.eval(passwd1), 'x')
        solution2 = format(solution_state.solver.eval(passwd2), 'x')

        # 下面的se方法也是可行的,但官方已经提示要丢弃使用了,建议还是用上面的
        # solution0 = format(solution_state.se.eval(passwd0),'x')
        # solution1 = format(solution_state.se.eval(passwd1),'x')
        # solution2 = format(solution_state.se.eval(passwd2),'x')

        solution = solution0 + " " + solution1 + " " + solution2
        print("[+] Success! Solution is: {}".format(solution))

    else:
        raise Exception('Could not find the solution')


if __name__ == "__main__":
    main()
04_angr_symbolic_stack
老规矩,扔ida里看下代码
int __cdecl main(int argc, const char **argv, const char **envp)
{
  printf("Enter the password: ");
  handle_user();
  return 0;
}

int handle_user()
{
  int result; // eax
  int v1; // [esp+8h] [ebp-10h]
  int v2; // [esp+Ch] [ebp-Ch]

  __isoc99_scanf("%u %u", &v2, &v1);
  v2 = complex_function0(v2);
  v1 = complex_function1(v1);
  if ( v2 == -1087905000 && v1 == -135078575 )
    result = puts("Good Job.");
  else
    result = puts("Try again.");
  return result;
}

int __cdecl complex_function0(int a1)
{
  return a1 ^ 0x256BEDF0;
}

unsigned int __cdecl complex_function1(int a1)
{
  return a1 ^ 0x9D110FE4;
}看起来也没什么差别,用常规方法直接handle是可行的,但是本题考查的是对栈的操作,我们需要直接对栈做变化,然后从一个指定的地方空降到程序中继续执行。看一下ida中汇编代码部分:
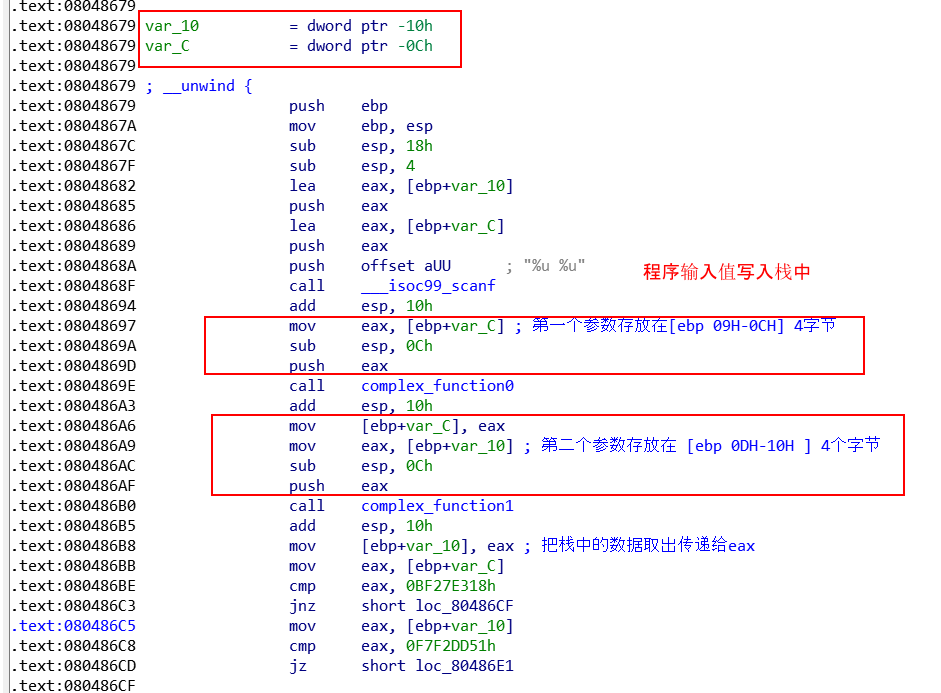
可以看到第一个参数是在0x08048697写入栈中的,因此,这个也是我们需要“空降”的地址,我们可以绘制此时的栈:
#            /-------- The stack --------\
# ebp ->     |          padding          |
#            |---------------------------|
# ebp - 0x01 |       more padding        |
#            |---------------------------|
#                        . . .
#            |---------------------------|
# ebp - 0x09 |   S1, last byte           |
#            |---------------------------|
#                        . . .
#            |---------------------------|
# ebp - 0x0c |   S1, first byte          |
#            |---------------------------|
# ebp - 0x0d |   S2, last byte           |
#            |---------------------------|
#                        . . .
#            |---------------------------|
# ebp - 0x10 |   S2, first byte          |
#            |---------------------------|
#                        . . .
#            |---------------------------|
# esp ->     |                           |
# \---------------------------/当我们要修改栈中内容时,需要将两个变量(S2,S2)写入到栈中,为此,需要先将esp指针抬高,即给要压入的参数(2个参数每个占4字节,一共占用8字节)创建空间,对应汇编代码就是sub esp, 0x08
下面是完整的题解,我会在必要的地方添加注释,帮助理解:
为了与普通方法对比,我将直接通过输出求解的方法
basic也加入了其中
import angr
import claripy
import sys

def basic():
    path_to_binary = '04_angr_symbolic_stack'
    project = angr.Project(path_to_binary)
    initial_state = project.factory.entry_state()
    simulation = project.factory.simgr(initial_state)

    def is_successful(state):
        stdout_output = state.posix.dumps(sys.stdout.fileno())

        return True if 'Good Job.' in stdout_output.decode('utf-8') else False

    def should_abort(state):
        stdout_output = state.posix.dumps(sys.stdout.fileno())
        return True if 'Try again.' in stdout_output.decode('utf-8') else False

    # Tell Angr to explore the binary and find any state that is_successful identfies
    # as a successful state by returning True.
    simulation.explore(find=is_successful, avoid=should_abort)

    if simulation.found:
        solution_state = simulation.found[0]
        solution = solution_state.posix.dumps(sys.stdin.fileno())
        print('[+] Success, flag is {}'.format(solution.decode('utf-8')))
    else:
        raise Exception('Could not find the solution')


def main():
    path_to_binary = '04_angr_symbolic_stack'
    project = angr.Project(path_to_binary)

    # 起始地址就是第一个参数被压入栈中的地址
    start_address = 0x08048697
    initial_state = project.factory.blank_state(addr=start_address)

    # 由于要对栈做操作,需要先将esp指向ebp
    initial_state.regs.ebp = initial_state.regs.esp

    # 构建两个位向量,即符号变量,同样是32位
    passwd_size_in_bits = 32
    password0 = claripy.BVS('password0', passwd_size_in_bits)
    password1 = claripy.BVS('password1', passwd_size_in_bits)

    # 下面需要将符号变量注入栈中,为此需要先腾出两个变量的空间,即2*4=8字节
    padding_length_in_bytes = 2*4  # :integer
    initial_state.regs.esp -= padding_length_in_bytes

    # 将变量压入栈中
    initial_state.stack_push(password0)  # :bitvector (claripy.BVS, claripy.BVV, claripy.BV)
    initial_state.stack_push(password1)  # :bitvector (claripy.BVS, claripy.BVV, claripy.BV)

    # 下面的步骤就和寄存器的部分一样了
    simulation = project.factory.simgr(initial_state)

    def is_successful(state):
        stdout_output = state.posix.dumps(sys.stdout.fileno())
        return True if 'Good Job.' in stdout_output.decode('utf-8') else False

    def should_abort(state):
        stdout_output = state.posix.dumps(sys.stdout.fileno())
        return True if 'Try again.' in stdout_output.decode('utf-8') else False

    simulation.explore(find=is_successful, avoid=should_abort)

    if simulation.found:
        solution_state = simulation.found[0]
        solution0 = solution_state.solver.eval(password0)
        solution1 = solution_state.solver.eval(password1)
        print("[+] Success, flag is: {} {}".format(solution0, solution1))
    else:
        raise Exception('Could not find the solution')
#
if __name__ == '__main__':
    main()
    # basic()
05_angr_symbolic_memory
照例查看一下反编译的源码:
int __cdecl main(int argc, const char **argv, const char **envp)
{
  int i; // [esp+Ch] [ebp-Ch]

  memset(user_input, 0, 0x21u);
  printf("Enter the password: ");
  __isoc99_scanf("%8s %8s %8s %8s", user_input, &unk_9FD92A8, &unk_9FD92B0, &unk_9FD92B8);
  for ( i = 0; i <= 31; ++i )
    *(_BYTE *)(i + 167613088) = complex_function(*(char *)(i + 167613088), i);
  if ( !strncmp(user_input, "FINYOEXAGBOWGBBJRUCGWNQJZNFZTPPQ", 0x20u) )
    puts("Good Job.");
  else
    puts("Try again.");
  return 0;
}


int __cdecl complex_function(signed int a1, int a2)
{
  if ( a1 <= 64 || a1 > 90 )
  {
    puts("Try again.");
    exit(1);
  }
  return (9 * a2 + a1 - 65) % 26 + 65;
}程序对输入8字节数据经过32次循环变换,最后取前20位与指定字符串比较,同样地,我们需要找一个“空降”位置,为了不影响结果,该位置要在scanf之后,

我们将初始化的状态定在scanf执行之后,080485FE是esp腾出空间给4个8字节变量,因此,选择080485FE或者08048601作为起始地址都是可以的。
接着因为我们需要修改内存中的数据,通过双击user_input变量查看输入的数值被存储到了哪里,结果如下:
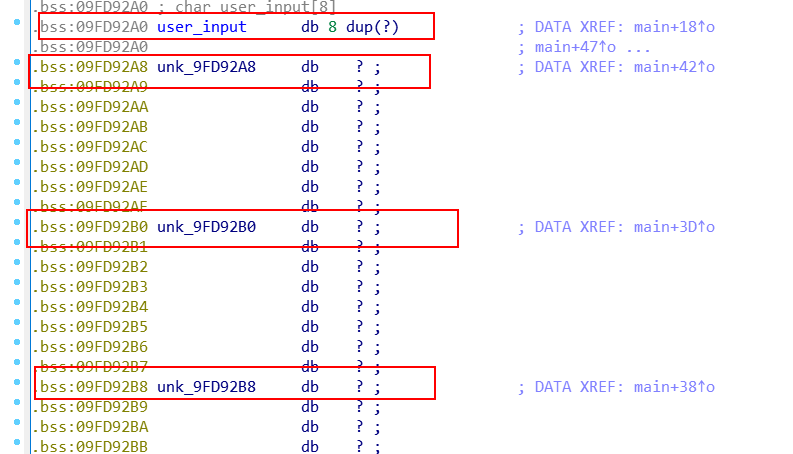
可以看到在bss段中,四个变量顺序存储(间隔为8字节),user_input起始地址09FD92A0就是我们要“空降”的位置。angr允许通过操作内存,插入符号变量,主要通过memory的两个接口(单位为bytes):
load(addr,...): 读取指定地址的内存
def load(self, addr, size=None, condition=None, fallback=None, add_constraints=None, action=None, 	      endness=None, inspect=True, disable_actions=False, ret_on_segv=False):
    """
    Loads size bytes from dst.
        :param addr:             The address to load from.
        :param size:            The size (in bytes) of the load.
        :param condition:       A claripy expression representing a condition for a conditional load.
        :param fallback:        A fallback value if the condition ends up being False.
        :param add_constraints: Add constraints resulting from the merge (default: True).
        :param action:          A SimActionData to fill out with the constraints.
        :param endness:         The endness to load with.
    """
store(addr, ...): 向指定内存写入数据
def store(self, addr, data, size=None, condition=None, add_constraints=None, endness=None, action=None,
              inspect=True, priv=None, disable_actions=False):
        """
        Stores content into memory.
        :param addr:        A claripy expression representing the address to store at.
        :param data:        The data to store (claripy expression or something convertable to a claripy expression).
        :param size:        A claripy expression representing the size of the data to store. #大小
        ...
下面是完整的题解,我在必要的地方添加了注释,帮助理解
import angr
import claripy
import sys


def main():
    path_to_binary = '05_angr_symbolic_memory'
    project = angr.Project(path_to_binary)

    # 初始化状态位置,在scanf函数之后的两个均可
    start_address = 0x080485FE
    initial_state = project.factory.blank_state(addr=start_address)

    # 注意这次输入的数据是8字节的,因此符号变量的位数是8*8=64
    passwd_size_in_bits = 8*8
    password0 = claripy.BVS('password0', passwd_size_in_bits)
    password1 = claripy.BVS('password1', passwd_size_in_bits)
    password2 = claripy.BVS('password2', passwd_size_in_bits)
    password3 = claripy.BVS('password3', passwd_size_in_bits)


    # 要注入符号变量的位置,即输入变量在内存中的地址
    password0_address = 0x09FD92A0
    initial_state.memory.store(password0_address, password0)
    # 由于4个变量是连续存储,直接按8字节叠加即可
    initial_state.memory.store(password0_address + 0x08, password1)
    initial_state.memory.store(password0_address + 0x10, password2)
    initial_state.memory.store(password0_address + 0x18, password3)

    # 后面与之前一样
    simulation = project.factory.simgr(initial_state)

    def is_successful(state):
        stdout_output = state.posix.dumps(sys.stdout.fileno())
        return True if 'Good Job.' in stdout_output.decode('utf-8') else False

    def should_abort(state):
        stdout_output = state.posix.dumps(sys.stdout.fileno())
        return True if 'Try again.' in stdout_output.decode('utf-8') else False

    simulation.explore(find=is_successful, avoid=should_abort)

    if simulation.found:
        solution_state = simulation.found[0]
        # cast_to=bytes 是将原本8字节存储数据按照bytes显示,最后decode转换成普通字符串
        solution0 = solution_state.solver.eval(password0, cast_to=bytes).decode('utf-8')
        solution1 = solution_state.solver.eval(password1, cast_to=bytes).decode('utf-8')
        solution2 = solution_state.solver.eval(password2, cast_to=bytes).decode('utf-8')
        solution3 = solution_state.solver.eval(password3, cast_to=bytes).decode('utf-8')
        print("[+] Success, flag is: {} {} {} {}".format(solution0, solution1, solution2, solution3))
    else:
        raise Exception('Could not find the solution')

if __name__ == '__main__':
    main()
06_angr_symbolic_dynamic_memory
本题和上题相似,只不过不再由堆栈分配内存,而是molloc动态分配,先看下源码:
int __cdecl main(int argc, const char **argv, const char **envp)
{
  char *v3; // ebx
  char *v4; // ebx
  int v6; // [esp-10h] [ebp-1Ch]
  int i; // [esp+0h] [ebp-Ch]

  buffer0 = (char *)malloc(9u);
  buffer1 = (char *)malloc(9u);
  memset(buffer0, 0, 9u);
  memset(buffer1, 0, 9u);
  printf("Enter the password: ");
  __isoc99_scanf("%8s %8s", buffer0, buffer1, v6);
  for ( i = 0; i <= 7; ++i )
  {
    v3 = &buffer0[i];
    *v3 = complex_function(buffer0[i], i);
    v4 = &buffer1[i];
    *v4 = complex_function(buffer1[i], i + 32);
  }
  if ( !strncmp(buffer0, "ZTWVXHOA", 8u) && !strncmp(buffer1, "HHPPETFV", 8u) )
    puts("Good Job.");
  else
    puts("Try again.");
  free(buffer0);
  free(buffer1);
  return 0;
}


int __cdecl complex_function(signed int a1, int a2)
{
  if ( a1 <= 64 || a1 > 90 )
  {
    puts("Try again.");
    exit(1);
  }
  return (13 * a2 + a1 - 65) % 26 + 65;
}程序动态创建两个9字节的缓冲区,输入两个字符串,并以8字节存储输入缓冲区,对缓冲区中的数据进行complex_function变换,将变换后的字符串与指定的两个字符串比较。
先确定一下我们需要开始的地址(即空降位置),找到scanf函数,选择下面第一个或第二个地址即可:

记录地址08048696,这是之后的start_address,由于我们直接从该处模拟执行,因此前面的代码不会被执行,即
buffer0 = (char *)malloc(9u);
buffer1 = (char *)malloc(9u);上面是molloc函数为buffer动态分配地址的代码, 由于不被执行,因此我们需要手动地给buffer0,buffer1指向一个地址(虚拟地址),相当于模拟了molloc的操作,检查ida中buffer0, buffer1的地址如下:

这两个地址是buffer0, buffer1本身被存放的内存地址,我们需要让他们存储的内容是我们提供的虚拟地址,可以通过memory.store(add,data)的方式往这两个指定内存地址写入我们的虚拟地址。
这部分可能有点混乱,我们可以思考一下正常程序执行时候的地址指向:
buffer0 -> malloc()分配地址 -> string0
buffer1 -> malloc()分配地址 -> string1
由于angr模拟执行的时候没有
molloc分配的环节,即 $buffer\to \cancel{malloc} -> string$ ,因此我们需要在buffer真实存储的位置填写一个fake_addr(任意,只要不被使用即可),并让其指向string符号变量,如下buffer0 -> fake_addr -> string0 buffer1 -> fake_addr -> string1
下面是题解,我会在必要地方添加注释,帮助理解:
import angr
import claripy
import sys

def main():
    path_to_binary = '06_angr_symbolic_dynamic_memeory'
    project = angr.Project(path_to_binary)

    start_address = 0x08048696
    initial_state = project.factory.blank_state(addr=start_address)

    passwd_size_in_bits = 8 * 8
    password0 = claripy.BVS('password0', passwd_size_in_bits)
    password1 = claripy.BVS('password1', passwd_size_in_bits)

    # 这里我们提供一个fake_addr(任意不影响现有地址即可),让buffer指向它,模拟malloc操作
    fake_heap_address0 = 0xffffc93c
    pointer_to_malloc_memory_address0 = 0x09FD92AC   # 该地址为buffer0的地址
    # angr默认大端,开源直接用project.arch.memory_endness 设置和程序一样
    initial_state.memory.store(pointer_to_malloc_memory_address0, fake_heap_address0, endness=project.arch.memory_endness)

    fake_heap_address1 = 0xffffc94c
    pointer_to_malloc_memory_address1 = 0x09FD92B4  # 该地址为buffer0的地址
    #  angr默认大端,开源直接用project.arch.memory_endness 设置和程序一样
    initial_state.memory.store(pointer_to_malloc_memory_address1, fake_heap_address1, endness=project.arch.memory_endness)

    # 将我们需要的符号变量插入到我们提供的fake_address中,这样在执行的时候就会自动将这部分的变量取出
    initial_state.memory.store(fake_heap_address0, password0)
    initial_state.memory.store(fake_heap_address1, password1)

    simulation = project.factory.simgr(initial_state)

    def is_successful(state):
        stdout_output = state.posix.dumps(sys.stdout.fileno())
        return True if 'Good Job.' in stdout_output.decode('utf-8') else False

    def should_abort(state):
        stdout_output = state.posix.dumps(sys.stdout.fileno())
        return True if 'Try again.' in stdout_output.decode('utf-8') else False

    simulation.explore(find=is_successful, avoid=should_abort)

    if simulation.found:
        solution_state = simulation.found[0]
        # cast_to=bytes 是将原本8字节存储数据按照bytes显示,最后decode转换成普通字符串
        solution0 = solution_state.solver.eval(password0, cast_to=bytes).decode('utf-8')
        solution1 = solution_state.solver.eval(password1, cast_to=bytes).decode('utf-8')
        print("[+] Success, flag is: {} {}".format(solution0, solution1))
    else:
        raise Exception('Could not find the solution')

if __name__ == '__main__':
    main()
07_angr_symbolic_file
查看反编译代码:
int __cdecl __noreturn main(int argc, const char **argv, const char **envp)
{
  signed int i; // [esp+Ch] [ebp-Ch]

  memset(buffer, 0, 0x40u);
  printf("Enter the password: ");
  __isoc99_scanf("%64s", buffer);
  ignore_me((int)buffer, 0x40u);
  memset(buffer, 0, 0x40u);
  fp = fopen("MRXJKZYR.txt", "rb");
  fread(buffer, 1u, 0x40u, fp);
  fclose(fp);
  unlink("MRXJKZYR.txt");
  for ( i = 0; i <= 7; ++i )
    *(_BYTE *)(i + 134520992) = complex_function(*(char *)(i + 134520992), i);
  if ( strncmp(buffer, "YLYSSSEV", 9u) )
  {
    puts("Try again.");
    exit(1);
  }
  puts("Good Job.");
  exit(0);
}
程序本身的工作很好理解:
- 读取用户输入的一个64字节的字符串,将其写入到文件
MRXJKZYR.txt - 读取文件
MRXJKZYR.txt中的数据,对读取的数据进行complex_fucntion变换 - 将结果与目标字符串比较是否符合条件
跟以往几题不同的是,这次不再是直接的终端输入了,而是从文件中读取数据,因此,我们需要模拟一个文件,对文件进行符号化。
在angr中,对文件系统进行模拟需要通过angr.storage.SimFile(name, content, size)对象,接收三个参数:
name: 要模拟的文件名称content:Optional:模拟的文件内容,通常传入的是一个BV(bitvector)对象,表示符号化的变量,也可以传入stringsize:Optional:文件的大小
当完成文件的模拟后,就像我们生成一个符号变量之后需要将其添加到state中的指定位置(如寄存器,内存,栈)一样(将符号化变量添加到初始化状态中),生成的模拟文件也需要添加到指定的state当中,添加的方式有两种:
- 利用
state.fs.insert(filename, simfile)方法:传入文件名和相应的模拟文件对象(SimFile),类似于之前state.memory.store(fake_heap_address0, passwd0)这部分操作 - 利用
state.pofix.fs选项以文件名的字典来预配置SimFile
symbolic_filesystem = {
    'filename' : simfile
}
state.posix.fs = symbolic_filesystem上面的两部分操作分别对应之前的创建符号变量(BV)和将符号变量插入到指定位置中,可以将前面的题目与这部分相应位置对比帮助自己理解这个过程,如下图:
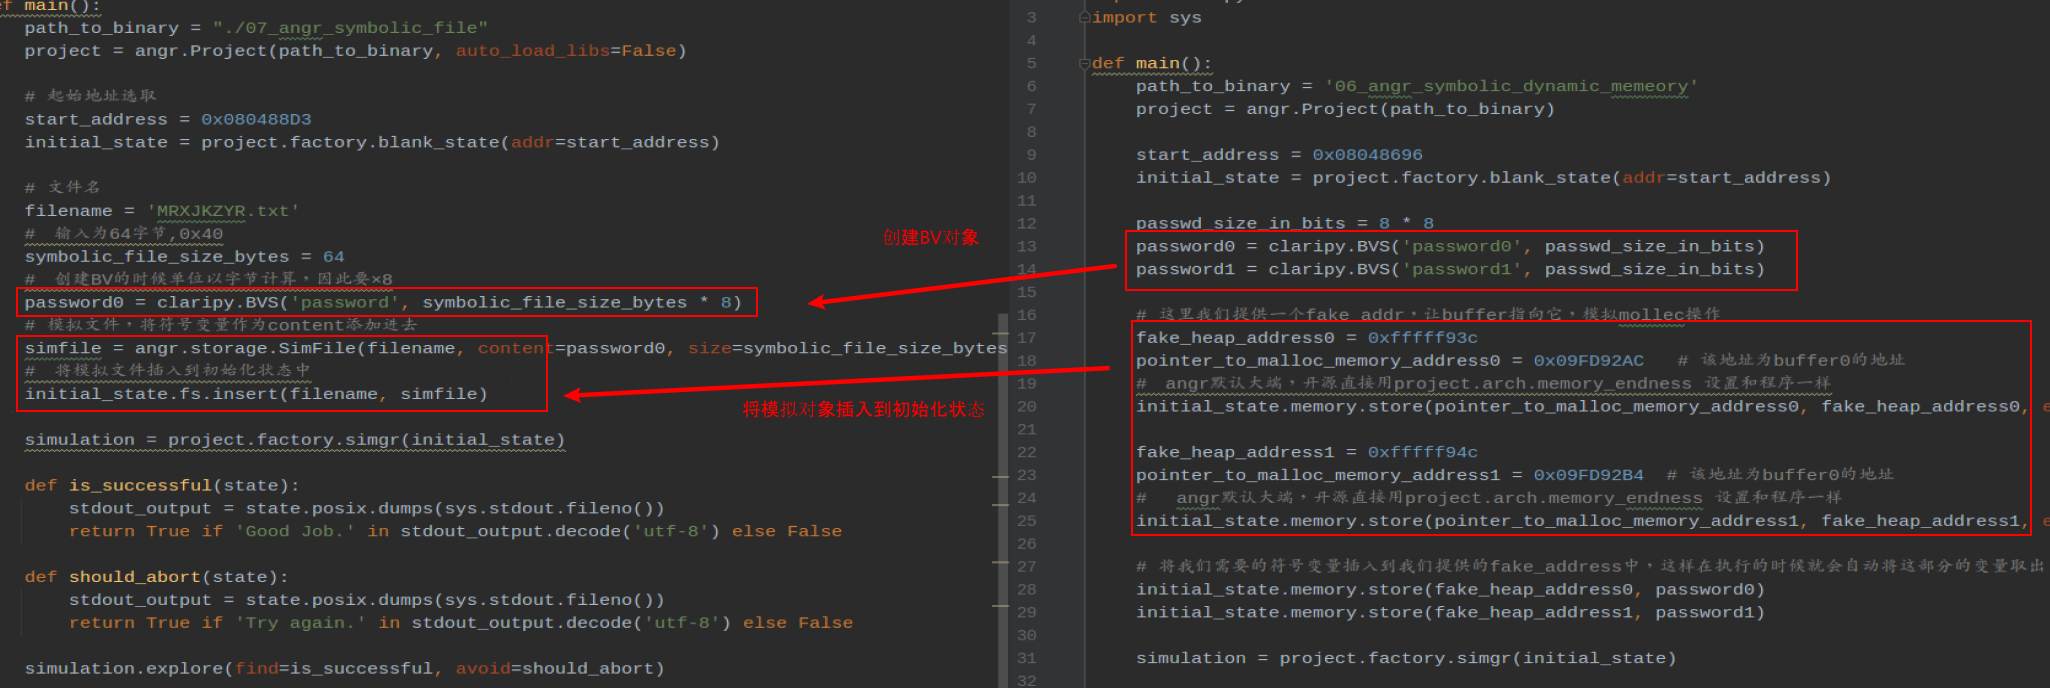
还有一个重要的地方是起始地址的选择,程序在第一次scanf输入之后,执行ignore_me,我们的符号变量模拟的是此scanf的输入,选择调用scanf结束之后的地址即可。
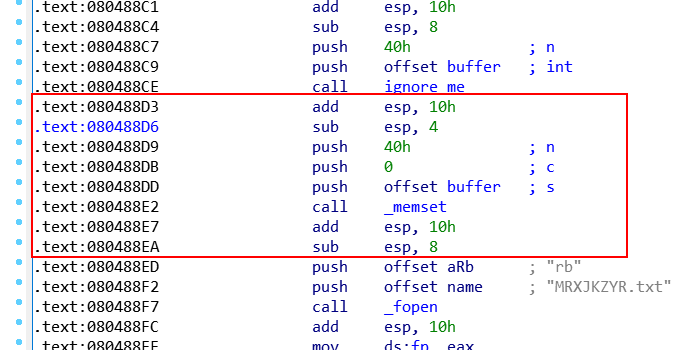
这里我采用了0x80488D3
下面是题解,我在必要的地方添加了注释,帮助理解:
import angr
import claripy
import sys

#
def main():
    path_to_binary = "./07_angr_symbolic_file"
    project = angr.Project(path_to_binary, auto_load_libs=False)

    # 起始地址选取
    start_address = 0x80488D3
    initial_state = project.factory.blank_state(addr=start_address)

    # 文件名
    filename = 'MRXJKZYR.txt'
    # 输入为64字节,0x40
    symbolic_file_size_bytes = 64
    # 创建BV的时候单位以字节计算,因此要×8
    password0 = claripy.BVS('password', symbolic_file_size_bytes * 8)
    # 模拟文件,将符号变量作为content添加进去
    simfile = angr.storage.SimFile(filename, content=password0, size=symbolic_file_size_bytes)
    # 将模拟文件插入到初始化状态中
    initial_state.fs.insert(filename, simfile)

    simulation = project.factory.simgr(initial_state)

    def is_successful(state):
        stdout_output = state.posix.dumps(sys.stdout.fileno())
        return True if 'Good Job.' in stdout_output.decode('utf-8') else False

    def should_abort(state):
        stdout_output = state.posix.dumps(sys.stdout.fileno())
        return True if 'Try again.' in stdout_output.decode('utf-8') else False

    simulation.explore(find=is_successful, avoid=should_abort)

    if simulation.found:
        solution_state = simulation.found[0]
        # cast_to=bytes 是将原本8字节存储数据按照bytes显示,最后decode转换成普通字符串
        solution0 = solution_state.solver.eval(password0, cast_to=bytes)
        print("[+] Success, flag is: {:.8s}".format(solution0.decode('utf-8')))
    else:
        raise Exception('Could not find the solution')

if __name__ == '__main__':
    main()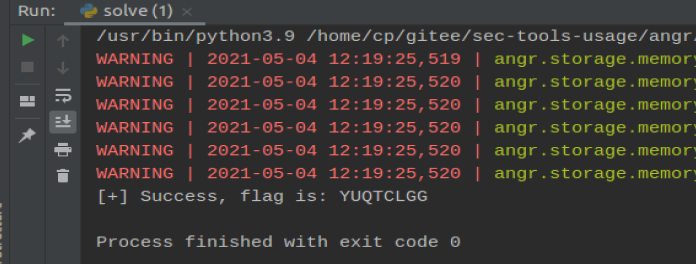
总结
本文主要撰写练习了angr_ctf中的前6道题目,这里对他们分别简单总结一下:
- angr_find:最简单的根据地址查找路径,提供一个想要执行路径相关的地址,解析得到对应的测试用例
- angr_void:在
find的基础上,添加了不希望执行的路径信息(该路径上一个相关地址),在大型程序中能够大大提高执行效率 - angr_find_condition: 按照条件执行路径,如需要分支输出特定的结果才去执行,这避免了找一堆执行路径相关地址的麻烦
- angr_symbolic_registers: 将angr符号变量直接写入寄存器中,此时不再需要从程序入口点
main进入,可以跳过许多不相关的代码,后面的几题基本也是围绕输入数据存储在哪,如何直接“空降”到指定位置,并让程序正常模拟执行。 - angr_symbolic_stack: 输入结果不再保存到寄存器,而是存储到栈中,需要添加对栈的操作,手动将符号变量压入栈
- angr_symbolic_memory: 直接修改内存中保存的内容,学习
memory.store()的使用 angr_symbolic_dynamic_memory: 模拟
malloc动态分配内存地址,提供fake_address(替代malloc分配地址空间)angr_symbolic_file:使用
angr的模拟文件系统,实现对文件数据的符号化
参考
本博客所有文章除特别声明外,均采用 CC BY-SA 4.0 协议 ,转载请注明出处!
